
Are you looking for easy Cricut Valentine’s Day card ideas and projects? Learn how to make quick and simple Cricut Valentine’s Day Cards with Cricut Joy Xtra or any other Cricut cutting machine your loved ones will adore.
In this post, I will show you how to make the perfect card with Cricut Cutaway Cards using designs from Creative Fabrica and Cricut Access and include your own personal touch.
Cricut Cutaway Cards are a popular project for Beginners, so if you’re new to Cricut, paper crafts are a great way to begin.
I will be using my Windows desktop computer with Cricut Design Space’s latest version, 8.16.46. I will cut designs from Creative Fabrica and Cricut Access with my Cricut Joy Xtra. You can use
This is not a sponsored post. Maker’s Corner Crafts purchased all products used in this tutorial. Makers Corner Crafts is reader-supported. If you make a purchase through one of my links, I earn a small commission at no additional cost to you. As an Amazon Associate, I earn from qualifying purchases. Learn more in my Affiliate Disclosure.
- Supplies You’ll Need
- Cricut Valentine’s Day Card Design Options
- Upload the Design to Cricut Design Space
- Choosing Cricut Access Designs
- Preparing the Design for Cricut Cutaway Cards
- Make the Valentine’s Day Cards
- Preparing the Cricut Card mat
- Cutting the Card Design
- Tips for Creating Valentine’s Day Cards with Cricut
- FAQs and Troubleshooting
- Conclusion
Supplies You’ll Need
- Cricut Cutting Machine
- Cricut Joy Blade or Fine Point Blade
- Cricut Joy Card Mat, Cricut Joy Xtra Card Mat, or 2×2 Cricut Card Mat
- Cricut Cutaway Cards
- A Brayer (recommended but optional)
- Essential tools for weeding
- Creative Fabrica design bundle Valentine’s Day Gift Card SVG Bundle 1002 (optional)
Cricut Valentine’s Day Card Design Options
You can make fast and easy Valentine’s Day gifts and homemade cards using pre-existing designs from Creative Fabrica and Cricut Access that you can customize for your Cricut projects.
Creative Fabrica has hundreds of thousands of designs, and its licensing structure includes personal and commercial rights. They have an All-Access subscription and individual purchasing. They also offer a free trial for new users, and it is a great way to try out what they offer. Learn all about Creative Fabrica and what they have to offer in my post, Creative Fabrica Fonts, Designs and More: Great for Crafters.
You can also use Cricut designs if you have a Cricut Access Subscription. Cricut Access provides hundreds of thousands of cut files, popular projects, graphics, sentiments, and adorable designs for your crafting needs. You can also purchase designs individually, and there is a free trial for first time users. Learn all about Cricut Access and what it has to offer in my post, Cricut Access Subscription: Do You Need It?
Choosing Designs with Creative Fabrica
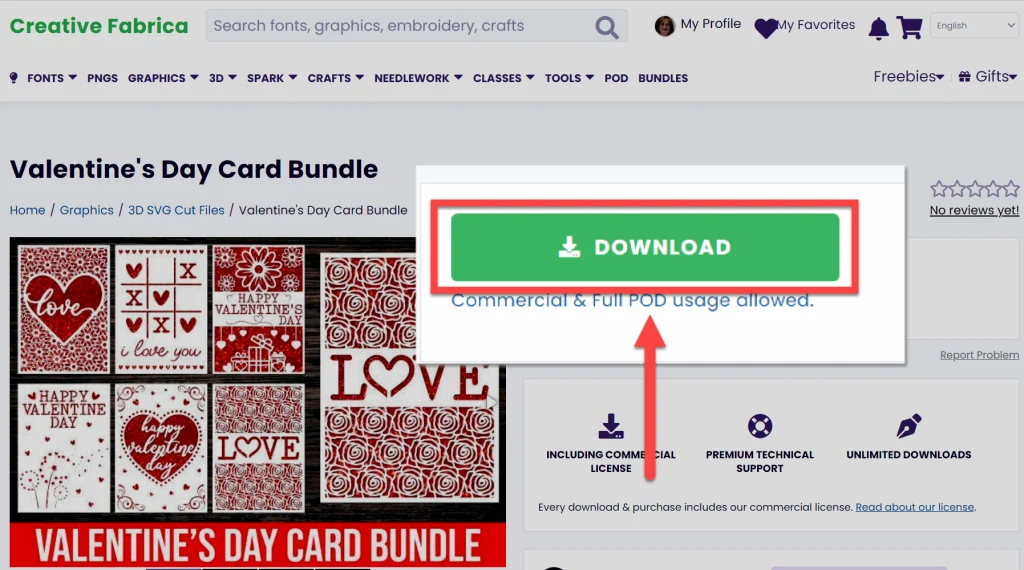
Find a design you want to use by searching Creative Fabrica for “Valentine’s Day” using your All-Access subscription or free trial. You can also search through their free SVG files for something you like. I will be using the design in the supplies list from Creative Fabrica.

Once you have found your designs, download them to your computer and make a note of the download location.
If you want to use Cricut designs, skip to Choosing Cricut Access Designs.
Unzipping the Design Files
Most design files downloaded from Creative Fabrica and other vendors will be zipped. Check your download folder for your design file. If it is zipped, unzip all of the content into a folder.


Visit Microsoft’s website for instructions on how to unzip files on Windows Computers if you need assistance.
Visit Apple’s website for instructions on how to unzip files on iOS computers.
Open the Cricut Cutaway Design Template in Design Space

Open the Cricut Cutaway Design Template directly into Cricut Design Space by clicking on the link. You can also search for the design in Cricut Design Space under Projects, but it can be hard to find among all the cards.

In the drop-down, select the finished card size that matches your Cricut Cutaway Cards.

The card dimensions can be found on the front of the Cricut Cutaway Card box.
More About Cricut Cutaway Cards
Cricut Cutaway Cards come in five sizes. The size will be listed on the front of the product box. Learn more about Cricut Cutaway Card sizes and Cricut Card Mat on Cricut’s website.

Click “Customize” on the bottom right to add the template to your Canvas.

On the Canvas, the Design Guide will appear in red. We will use this guide to size our design to be cut on the card.
Upload the Design to Cricut Design Space
If you have downloaded designs from Creative Fabrica or another vendor, you will need to upload the design to Cricut Design Space. Learn how in my post, How to Upload as SVG File to Cricut Design Space.
Select “Upload” on the left-hand side of the page and upload your SVG designs into Cricut Design Space.

Fill in the name and tag information on the right in the “Prepare to Upload” window.

Click “Upload” on the bottom right-hand side of the screen.

The Upload window will open, and the design will show under “Recent Uploads.

Click on the design and select “Add to Canvas” on the bottom right-hand side of the screen.

The design should appear on the Canvas in Cricut Design Space.
Choosing Cricut Access Designs

In Cricut Design Space, on the canvas tab, click “Images” on the left-hand side of the screen.

Search for “Valentine’s Day,” “heart shape,” “heart card,” or other Valentine phrases, images, and designs.

Select the “Cut Only” option under “Operation Type” on the left-hand side of the screen to search for SVG designs.

Select the “Free” box in the filter area on the left-hand side of the screen to search through Cricut’s free designs, or leave it unchecked if you have a Cricut Access subscription or plan to purchase designs individually.

When you find a design you like, click the green plus sign next to it to add to your canvas.

The design should appear on the canvas.
Preparing the Design for Cricut Cutaway Cards
Design File Instructions
Reading the designer’s instructions for the Creative Fabrica design file is essential. Often, you will find this information about the designer, the design, score lines, and where to go for additional assistance in a Readme or Instructions note, document, or PDF.

Locate instruction files that may have come with the Creative Fabrica design in the unzipped design folder.
Read the file, and make note of any instructions, including score lines, if mentioned.
Remove Any Unused Portion of the Design
You may not need to remove extra parts of the design depending on your chosen design. The design that I selected is intended to cut the entire card design from cardstock. Since I am using a Cutaway card, I only need the part of the design that will be cut from the card front.
I will use the Slice feature to remove the extra parts of the design.

Select the design and click on the “Ungroup” button at the top of the screen above the Layers Panel to ungroup the layers.
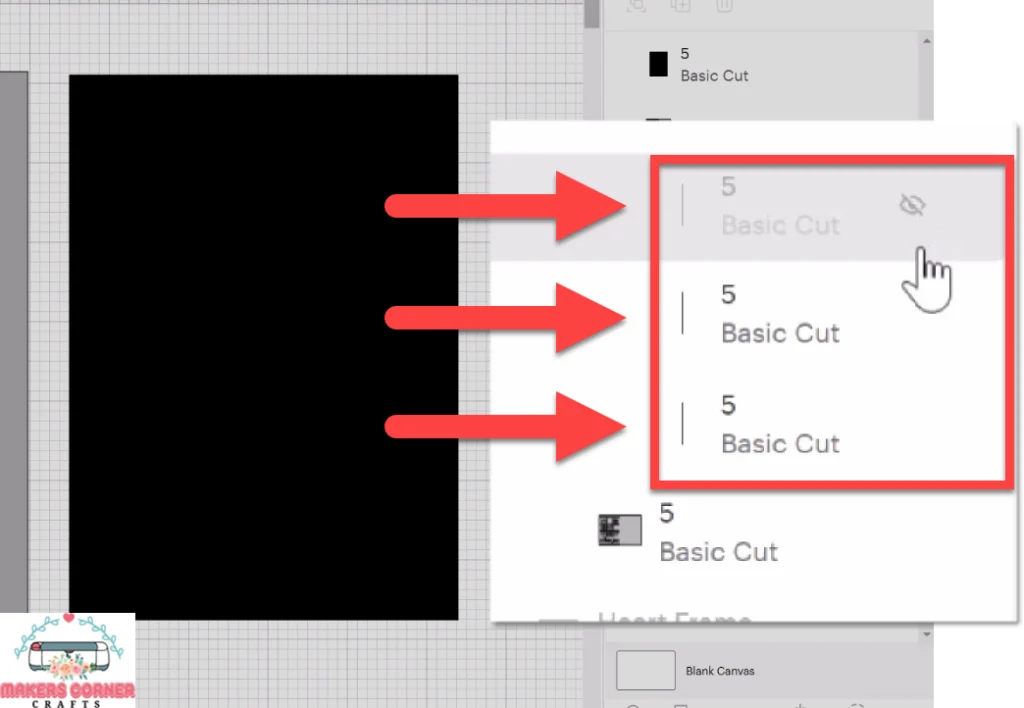
Hide the three cut lines by selecting the “eye” next to each one.

Add a square shape to the canvas or use the extra square shape from the design.
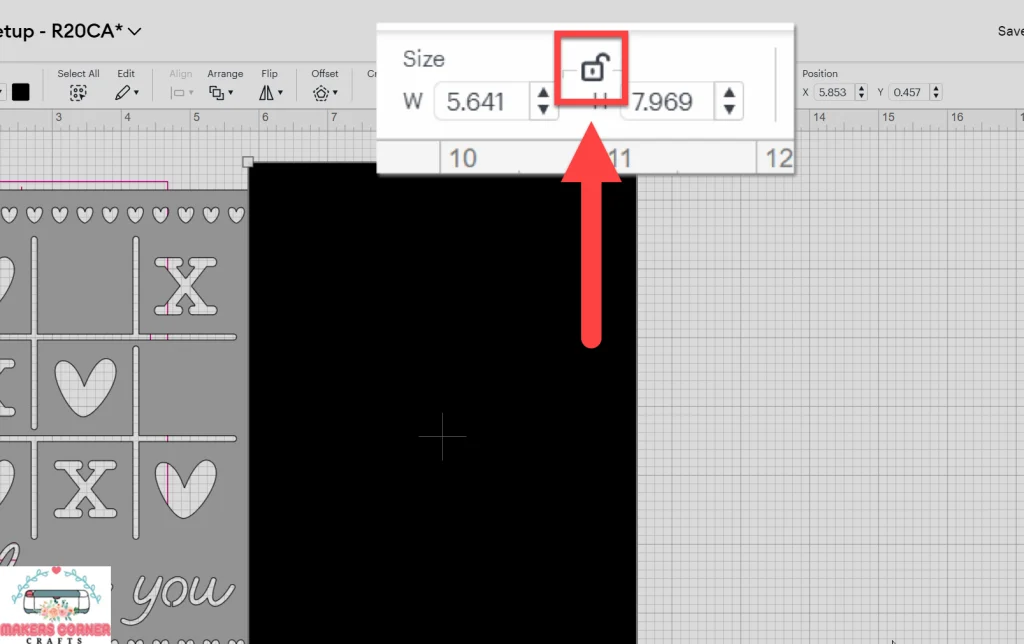
Click on the lock to unlock the “maintain ratio”. This will allow you to resize the square into any height and width.

Resize the square over the unwanted part of the design using the handles on the corner of the shape.

Select the square shape and the design. Click “Slice” under the Layers Panel on the right-hand side of the screen.

Separate the slices. Delete the extra slices.

The only thing remaining on the screen is the cut design and the design guide.
Resize the Design
We want the design to fit within the dotted lines of the design guide, which represents the front of the Cutaway Card.
Select the design. A bounding box will appear around it.
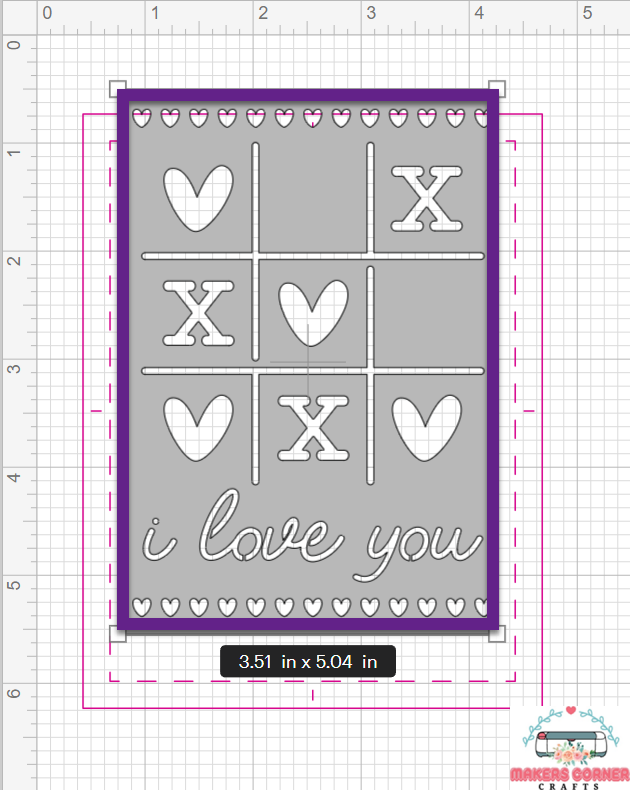
Move the design over the Cutaway Card Design Guide.

Close the ratio lock to maintain the sizing ratio while resizing the design. Click on the lock above the width and height on the Editing toolbar at the top of the screen to close and open it.

Using the handles in the corners of the bounding box, click and drag to resize the design to fit within the dotted lines of the guide.

Unlock the ratio lock and modify the design’s width and height until it fits and looks like you want it.
Score Lines
Cutaway cards are pre-folded. This means we don’t need to create score lines for the middle fold of the card. If the designer disclosed any score lines in the instructions, you will need to hide or delete them from the design.
Follow the same steps used to hide the basic cut lines from the shape above. Click on the “eye” next to any basic cut line that represents a score line in the Layers Panel.


Save your project by clicking “Save” at the top of the screen on the right-hand side.
Make the Valentine’s Day Cards
Setting up for the Card Mat
The first step to creating cute cards is to check Cricut Design Space’s settings.

Click your avatar at the top of the Cricut Design Space window on the right.

Select “Settings”.

Click on the “Load Type” tab.

Select your Cricut machine type in the “Defaults for” drop-down if it is not set correctly.
Under the “Load Type” drop-down, select “Card Mat” if not already selected. Ignore the “Print Then Cut Page Size” option if it shows.

Select “Done” to close Cricut Design Space Settings.

Hide the Cutaway Card Design Guide. Select the Cutaway Card Design Guide in the Layers Panel.
Click on the “eye” next to it to hide it. This will keep Cricut from trying to cut the Design Guide.
Completing the Setup in Cricut Design Space

Select “Make” in the upper right-hand corner of Cricut Design Space.

The Material Load Type should indicate “On Card Mat.” Select “Card Mat” in the “Material Load Type” drop-down if it doesn’t.
Click “Cancel” in the bottom right side of the screen if that is not an option. Recheck and correct the settings.

In the “Material Size” drop-down, check that the size matches the size of the card you selected for the Cutaway Card Template.
The cut does not need to be mirrored, so leave the “Mirror” toggle off.

Click “Continue” on the bottom right-hand side of the screen.
Connecting to Your Cricut Cutting Machine
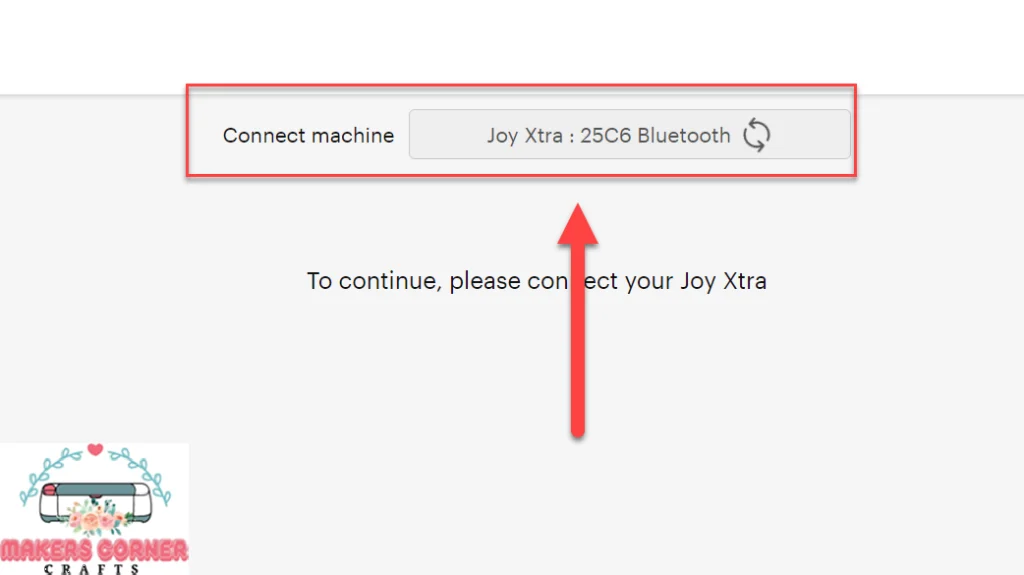
Wait for your Cricut to connect to Cricut Design Space on your computer at the top of the window.
If your Cricut doesn’t connect, see “My Cricut won’t connect to my machine” in the troubleshooting section below.

Select “Browse all materials“.

Search for and select “Cutaway Card + Backer. Click “Done”.
Preparing the Cricut Card mat

To attach the backer to the front of the card, remove the protective lining on the inside of the Cricut Cutaway Card.

Carefully place the Cutaway Card Backer decorative side down onto the adhesive on the inside of the card. This will allow the design to show through the cuts made on the front of the card.

Remove the protective sheet on the Cricut Card Mat.

Slide the back side of the card into the pocket.

Then, press the front of the card onto the adhesive on the top of the Cricut Card Mat. Use a brayer over the top to smooth it down to the adhesive.
Cutting the Card Design

Move the Star Wheels on your Cricut cutting machine to the sides to keep them from leaving impressions on the card while cutting. Cricut Design Space should warn you to do this.

Ensure the correct blade is loaded into the clamp on your Cricut cutting machine and that it’s free of debris.

Load the Cricut Card Mat into your Cricut cutting machine top-end first. Check to make sure it loaded straight.

Press the “Go” button on Cricut Maker or Explore series machines. For Cricut Joy or Joy Xtra, click “Go” in Cricut Design Space.

For Cricut Joy and Joy Xtra, click on “Unload” in Cricut Design Space when the card is completely cut.

Carefully remove the card from the Card Mat. Weed the front of the card.
Make any additional modifications to the inside of the card you would like, and place it in a Cutaway Card Envelope.

Your Valentine’s Day card is complete! Don’t forget to move your Star Wheels back on your Cricut.
Tips for Creating Valentine’s Day Cards with Cricut
- If your card mat is new, it may be really sticky. The easiest way to reduce the initial stickiness is to press the adhesive against a cotton shirt a few times.
- Always gather all the supplies you will need before crafting. You’ll stay more organized and be more efficient.
- Test the design for the card with copy paper to prevent extra cost and materials. This allows you to evaluate the size, design, and overall appearance before officially cutting it with expensive materials.
- Use the correct cut setting in Cricut Design Space. Each Cricut is unique in its cutting power and force. One machine may need extra pressure, while the same belonging to another only needs “Default pressure.” Once you have the perfect cut settings for your machine, save it in a Cut Settings Guide.
- Make sure the Fine Point Blade or the Joy Blade is clean and sharp. Clean the blade using aluminum foil. Watch this quick YouTube short to learn how. If problems persist in cutting intricate and small designs, try changing the blade to a new one.
- Use a well-maintained Cricut card mat. Make sure your card mat is clean and free of debris. Check the adhesive and ensure the Cutaway Card will stick to the mat. Cricut card mats are consumable, so you must replace them in time.
FAQs and Troubleshooting
My Cricut won’t connect to my computer.
If Cricut Design Space is complaining that it can’t find your Cricut, it has not connected to your desktop computer.
All Cricut cutting machines except the Cricut Joy and the Cricut Joy Xtra can connect to your computer with Bluetooth or via USB cable. The Joy series machines only connect via Bluetooth. To use Bluetooth, your computer must support it. If it does not, you can buy a Bluetooth adapter.
You may need additional help if you can’t get the Cricut to connect to your computer using Bluetooth or the USB cable. Use Cricut’s help pages or call Member Services for additional assistance.
Connection Types supported by Cricut machine:
- Bluetooth and USB cable: Cricut Venture,
Cricut Maker 3 , Cricut Maker, Cricut Explore 3, and Cricut Explore Air 2 - Bluetooth only: Cricut Joy and Cricut Joy Xtra.
Cuts Aren’t Clean and Precise
If your cuts are not turning out as clean or precise as you’d like, there are a few things you can check.
First, ensure that your blade is sharp and properly installed. A dull or incorrectly installed blade can result in jagged edges or incomplete cuts.
Additionally, ensure your blade depth is appropriate for your material.
Adjusting the pressure settings on your Cricut machine can also help achieve cleaner cuts.
Make sure your blade is free of debris by cleaning it with aluminum foil. If all else fails, try replacing the blade with a new one. Learn more about Cricut blades in my post, The Guide to All Cricut Blades.
You may also need to replace your Cricut Card Mat or LightGrip cutting mat. These are consumable and will need to be replaced over time. Learn more about Cricut Cutting mats in my post, The Guide to Cricut Cutting Mats.
Use a Brayer. Using a brayer to adhere the material to your card mat or cutting mat can help with clean cuts.
If you have taken all the above steps but still need help, try a less intricate design.
Can I make a single card with the 2×2 Cricut Card mat?
Yes. You can make up to four cards at a time with the Cricut 2×2 card mat.
Can I make my own Cutaway Card?
You can create cards from scratch with a sheet of cardstock using Cricut Design Space and quality cardstock. Read my post, How to Make a Card with Cricut, for more information.
Can I sell the cards I make?
You can sell the Cricut Valentine cards you make if your design has a commercial license, like the one you get with Creative Fabrica designs. Cricut also supports commercial sales with its Angel Policy, but there are caveats with some of Cricut’s Licensed designs. To learn more about licensing, read about Cricut’s Angel Policy.
Are Cutaway Cards Different Than Insert Cards?
Cricut Insert Cards use four slots on the front of the card to hold the decorative piece to the front. Design choices are limited because there is no adhesive to hold orphaned pieces of the design to the card.
Cutaway cards have adhesive on the back of the front of the card instead of slots. The decorative backer is held in place by this adhesive. Designs with “floating pieces” will stay attached to the backer after weeding the negative portions of the design, as the hearts on the card made in this tutorial.
Learn more about Cricut Cutaway Cards and Cricut Insert Cards on Cricut’s website.
I was looking for information on how to use Cricut Pens and Markers
This Cricut tutorial is an introduction to Cricut Cutaway Cards. You can write on the inside of the cards using Cricut Pens and Markers. Learn more at Cricut’s website in the help section.
Conclusion
Making these handmade Valentines with Cricut will leave a lasting impression on your loved ones and best friends. Following the step-by-step instructions in this post, you can make amazing Valentine’s Day crafts they will cherish forever.
I hope you enjoyed this post on Cricut Valentine’s Day card ideas. Please comment below if you have any questions or concerns, and I will answer promptly.
Want to send me a note? Visit the Makers Corner Crafts Contact page.
Happy Valentine’s Day, and happy, happy crafting!
If you enjoyed this article, please pin it so others can find it, too!


Leave a Reply