



Want to impress your family and friends this holiday season? Add a personal touch to your presents with my collection of free printable holiday tags. I’ll guide you step-by-step through receiving the festive designs, importing them into Cricut Design Space, printing the tags, and cutting them with your Cricut cutting machine. In the end, you’ll know how to use Cricut’s “Print Then Cut” feature, and you’ll be on your way to cutting additional tags, stickers, labels, and more! Let’s get started!
This is not a paid or sponsored post. Maker’s Corner Crafts is reader-supported. If you purchase through one of my links, I earn a small commission at no additional cost to you. I appreciate your support! As an Amazon Associate, I earn from qualifying purchases. Learn more here.
What You’ll Need
- Cricut Maker Series machine, Explore Series machine, or Cricut Joy Xtra
- Cricut fine point blade or Joy blade
- A blue LightGrip cutting mat
- Spatula and scraper
- Brayer
- 8.5″ x 11″ white card stock, printable vinyl, label paper, or copy paper
- An inkjet printer
- Printable Holiday Gift Tags with personal use license.
Get the Free Printable Holiday Tags
In this post, we will use the FREE Printable Holiday Gift Tags file from the Makers Corner Crafts Shop. You can also get a $5 coupon for FREE to use on our low-cost products.

Save the file to your computer and note where you saved it.
Unzip the file. Inside you will find a PNG image named Holiday Gift Tags 2023. This is the file we will import into Cricut Design Space. Read this article on Wikihow if you need assistance with zip files.
Importing the Printable Christmas Labels
Before we begin, make sure your Cricut cutting machine has been calibrated for “Print Then Cut”. If you have not done this, please watch this video from Cricut.com and follow the instructions.
Additionally, if you haven’t installed Cricut Design Space on your computer yet, follow the directions from this Cricut.com link. Then come back for your next step.
Step 1: Open Cricut Design Space.
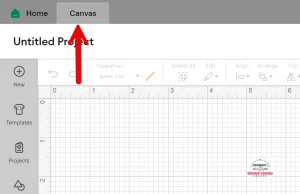
Step 2: Select “Canvas” at the top left of the screen.
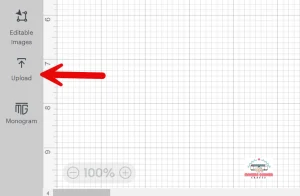
Step 3: Select “Upload” on the left-hand toolbar near the bottom.
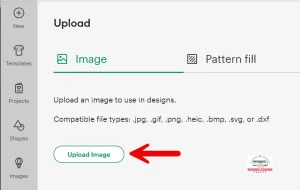
Step 4: Select “Upload Image”.
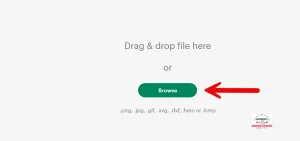
Step 5: Click on “Browse”.
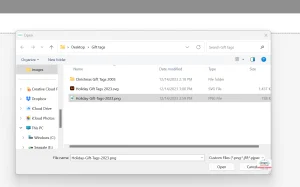
Step 6: Navigate to the folder where you saved the printable holiday gift tags.
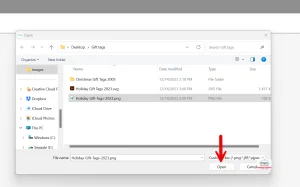
Step 7: Select the gift tag file and click “Open.”
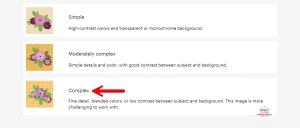
Step 8: Select “Complex” under “Image Type” and click “Continue” on the bottom right.
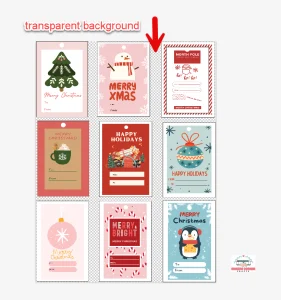
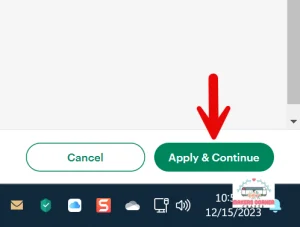
Step 9: The gift tag file will open and should look like the picture below. The background should be transparent. Click “Apply & Continue” on the bottom right.
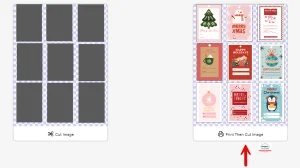
Step 10: Select the right-hand picture indicated with “Print Then Cut” on the bottom.
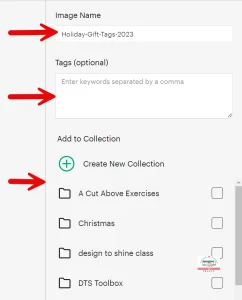
Step 11: You can rename the file, add tags to make it easier to find, and add it to a Collection if you’d like.
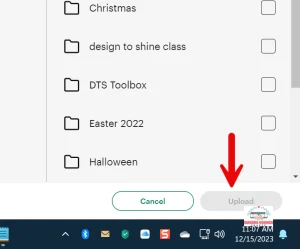
Step 12: Next, click “Upload” in the bottom right corner.

Step 13: The printable holiday tags will upload, and they should be on the far left of the screen. Select the gift tags and click “Add to Canvas”.
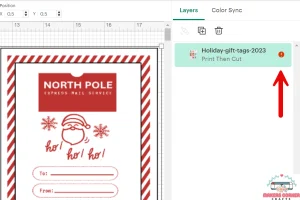
Step 14: There will probably be a warning in the layers panel on the right of the screen. Hover over and click on the red exclamation point.
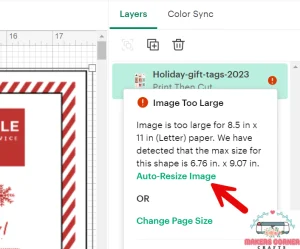
Step 15: It will tell you that the image is too large for “Print Then Cut”. Click on “Auto-Resize Image”. Now the gift cards will be the correct size for Print Then Cut.
Modifying and Printing the Christmas Tags
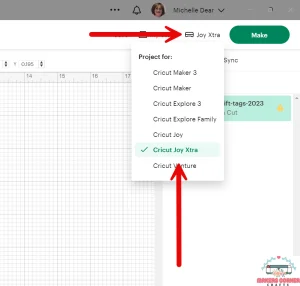
Step 16: Make sure the correct Cricut cutting machine is selected in the drop-down at the top right.

Step 17: Click on “Make” on the top right.
Note
Depending on which Cricut cutting machine you are using, you may get a pop-up about how you will cut the tags. Select “On Mat” if you get the pop-up. I am making mine on a Cricut Joy Xtra.
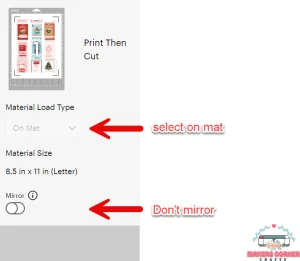
You do not need to mirror the images as these will be cut from cardstock, printable vinyl, label paper, or copy paper (your choice.)
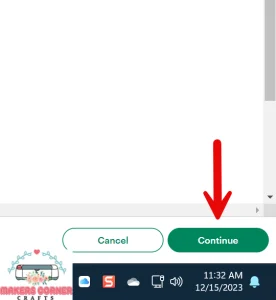
Step 18: Select “Continue”.
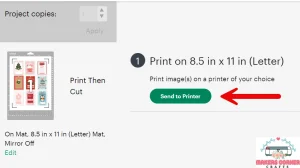
Step 19: Click “Send to Printer”. This is the “Print” part of Cricut’s Print Then Cut feature. If you have a rear feed tray, you can use cardstock to print these on. If you do not, you can print them on regular copy paper, printable vinyl or sticker paper which should work in your printer’s regular feed tray.
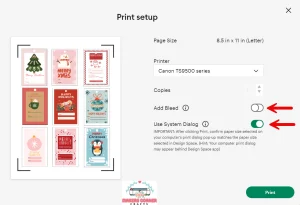
You do not need to select “Add Bleed” for the printable holiday tags. Turn on the printer’s system dialogue box.

In your printer’s system dialog, indicate cardstock and rear feed tray or printable vinyl/label paper/copy paper and the regular feed tray. Print at the best quality to get the highest color resolution.

Step 20: Place the cardstock, printable vinyl, label paper, or regular copy paper in the correct feed tray on your inkjet printer and select “Print”.
Step 21: Once the tags have been printed, check if the print needs to dry. Most likely, it will not, but every printer is different. Once the tags have dried, you are ready for the “Cut” part of Cricut’s “Print Then Cut” feature.
Cutting the printable Christmas gift tags with Cricut
Step 22: Place the cardstock on a StandardGrip cutting mat or printable vinyl/label paper/copy paper on a LightGrip cutting mat.
Step 23: Use the brayer to adhere the cardstock/printable vinyl/label paper/copy paper to the mat.
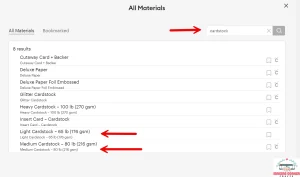
Step 24: In Cricut Design Space, click “Browse all materials”. Search and select cardstock for cardstock, printable vinyl for label paper or printable vinyl, or copy paper for regular copy paper based on your choice.
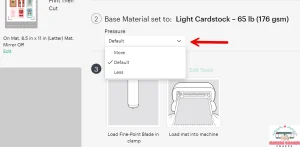
Step 25: Select more pressure if needed. Otherwise, leave it on “Default”.
Step 26: Load the Fine Point Blade in your Cricut cutting machine if it’s not already there.
Step 27: Load the cutting mat into your Cricut cutting machine.
Step 28: Depending on the machine you are using, either press the “Go” button on the machine or select “Go” in Cricut Design Space.
Your Cricut will read the registration marks and cut around the Christmas gift tags. If, for any reason, your Cricut doesn’t read the registration marks, darken the room as much as possible and have the Cricut try again. This will help the sensor read the registration marks on shiny printable vinyl or label paper.
Once Cricut reads the registration marks, it will cut the tags. When it is finished cutting, remove the mat from the machine.
Step 29: Weed the gift tags from the mat using the spatula and scraper tool.
That’s all there is to it! You’ve just used Cricut’s “Print Then Cut” feature! Now you have fabulous printable holiday tags for your Christmas gifts!
Conclusion
With these holiday gift tags, the presents under your Christmas tree will look so cute! And the printable Christmas gift tags will look so professional! Make this Christmas season special with free gift tags today! Merry Christmas, happy holidays, and season’s greetings from Makers Corner Crafts! And always, happy happy crafting.
If you enjoyed this article, you may also like:
- How to make print then cut stickers
- How to make temporary tattoos with Cricut
- The Best Printable Vinyl for Stickers
- How to make a card with Cricut
If you found this article helpful, please pin it so others can enjoy it too!



Leave a Reply